What's a torque wrench? It's a referee, says Greg Katsis, marketing manager for Sturtevant Richmont, a manufacturer of torque-measurement systems in Franklin Park, Ill. It makes sure that big, burly mechanics and those of slighter builds agree on when a bolt is "tight."
For components to work as the engineer intended, says Katsis, mating pieces must be held together with a precise amount of clamping force, which is determined by the amount of "tension" created in bolts as they're tightened. Tension is a force trying to stretch the bolt, and clamping force is proportional to tension, but working in the opposite direction. Using enough properly sized bolts yields the needed clamping force without stretching bolts to their elastic limit — the point beyond which they can't return to their original length.
To make sure mating parts are securely fastened, you need to determine clamping force. One way to do that is to measure bolt tension.
For example, "direct tension indicators" (DTIs), installed under the bolt head or nut, are basically washers with little stamped dimples that flatten as tension increases. The amount of deformation (determined by measuring the gap between the washer surface and the fastener) correlates to tension. Other tension indicators include systems that measure bolt stretch ultrasonically, as well as bolts with a substance in the head that changes color as tension increases (like the eye of a maintenance-free battery).
Perhaps a simpler way to determine clamping force, however, is to measure bolt tension indirectly, that is, by measuring the force (torque) applied to threaded fasteners. Engineers know how to fairly accurately correlate torque values to bolt tension and, thus, to clamping force. Although proponents of measuring bolt tension directly would say that their method is more accurate (mostly because torque measurements don't account for changes in friction, such as thread corrosion), measuring torque remains the common method for determining clamping force.
And the most widely used instrument for measuring torque applied to threaded fasteners is the torque wrench.
Torque basics, Hooke's law
Torque is force around a point or axis — a twisting force — and is calculated by multiplying an applied force by the distance through which the force works. In English units, the force is measured in pounds or ounces, and the distance in feet or inches. In the International System of Units (SI), force is measured in newtons and distance in meters. To illustrate, 10 pounds of force exerted at the end of a 3-foot breaker bar yield 30 pound-feet of torque at the socket on the end of the bar.
(The people who know about such things tell us that torque is most accurately expressed as "pound-feet" or "ounce-inches." The expressions, "foot-pounds" and "inch-ounces," they say, are technically measures of work, not torque. Common usage, however, has made the latter completely acceptable, and you might find torque-wrench scales identified either way.)
Everyone agrees, though, that Hooke's Law is at the heart of torque-wrench operation. Robert Hooke (1635–1703) was a brilliant Englishman — philosopher, inventor, architect and scientist — who is credited with discovering the law of elasticity. In layman's terms, Hooke's Law says that the amount an elastic (flexible) material bends (deforms) is in direct proportion to the force acting upon it. In more scientific terms, "strain" (deformation) is proportional to "stress" (force applied). And as long as the material's elastic limit is not exceeded, it will return to its original shape.
So, if you set a thin, flat bar of steel on edge and anchor it at one end, the bar will flex in direct proportion to how hard you push against its flat side. Release the bar and it springs back. Now, if you can correlate the flex of the bar to a scale, you'll have an indication of the force (torque) being exerted at the anchored end. This, in principle, is how torque wrenches work, but different types of wrenches use different mechanisms for applying Hooke's Law.
Beams, dials, clicks and digits
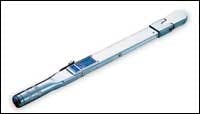
The flat-beam is the oldest, simplest and, according to some, the most accurate of all torque-wrench designs. It's still made in a wide variety of capacities, from small ounce-inch models to those with a top capacity of perhaps 300 pound-feet or more.
The flat-beam torque wrench has lost ground to other types of wrenches, however, because it has what some consider inherent disadvantages. To wit, you always need to see the scale when using it, and you have to interpolate readings that fall between scale markings. The flat-beam does not click, buzz, flash or vibrate when it reaches the torque setting you want, but it takes more than its share of abuse and rarely needs calibrating.
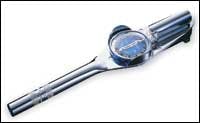
The dial-type torque wrench also employs Hooke's Law, often by deflecting a torsion bar at the "square drive" (the socket-attachment point). The torsion bar's movement may then be transferred via a "floating beam" to a clock-like mechanism with a dial scale. The standard dial-type, however, has the same disadvantages of the flat-beam — a line-of-sight scale and between-the-lines readings.
But, that said, Ray Pagels, director of sales for Precision Instruments, a long-time torque-wrench manufacturer in Des Plaines, Ill., makes the point that new dial-type wrenches can be adjusted to a desired torque, then can beep or flash when that torque is attained. Dial-type wrenches are available in a wide range of capacities and, according to Pagels, can be designed to deliver accuracies of 1 percent.
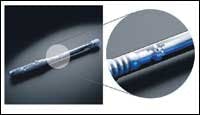
Perhaps the most widely used torque wrench in today's equipment shops is the micrometer-adjustable "clicker." Specific designs vary, but typically, as the tool's adjustable barrel is turned to select a specific torque value, a large spring is compressed against an interface mechanism (toggle, cam or low-friction roller) that engages a deflecting beam. When the deflection of the tool is sufficient to overcome the compressive forces at the interface, the beam disengages and the wrench "clicks."
Among the most recent of torque-wrench designs is the digital. The digital torque wrench typically reads to a greater degree of precision than other types, sometimes to plus/minus 1 percent from 20 to 100 percent of capacity. Our understanding of these wrenches is that they employ Hooke's Law by attaching a strain gauge (which passes varying amounts of electrical current as its shape changes) to a torsion bar. As the user tightens fasteners and deflects the torsion bar, the strain gauge interprets the deflection and reports it as a numerical value on the wrench's display.
So, the next time you pick up a torque wrench, remember, that even though it can do some hard work, it's first of all a precision measuring device. Treat it so, and it might last for decades.
This Precision Instruments' micrometer-adjustable torque wrench uses a spring to push two members — a plunger and beam — into compression at a roller-bearing interface. The wrench "clicks" when the desired torque is attained and the two members disengage. Always return a micrometer-adjustable wrench to its lowest scale setting to relieve pressure on the spring and to prolong its calibration.
|
|
|
|
|
|
|
|
|
|
|
|
|
|
| Acknowledgements | ||
| Construction Equipment thanks Greg Katsis, marketing manager for Sturtevant Richmont; and Ray Pagels, director of sales, and Larry Cook, engineer, Precision Instruments, for assistance in assembling this report. | ||
