Welding Standards Guide Equipment Repairs
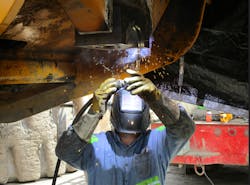
Welding creates problems for fleet managers because construction equipment does not fall into a neat category. A welder cannot qualify a hard-facing procedure to a structural steel welding code, for example, so how can they ensure that any repair provides the longest service life possible?
The American Welding Society (AWS), in recognition of the need for heavy equipment welding specifications, created the D14 Committee on Machinery and Equipment. The committee has produced a series of standards, including AWS D14.3/D14.3M:2019, Specification for Welding, Earthmoving, Construction, Agricultural, and Ground-Based Material Handling Equipment, and AWS D14.4/D14.4M:2019, Specification for the Design of Welded Joints in Machinery and Equipment.
According to Joseph Bailey, chair of the D14 Committee, the standards show fleets how to diagnose a problem and perform repairs.
“Standards enable you to learn from the best practices of others, so you don’t have to reinvent the wheel every time it cracks,” says Bailey, an engineering manager at Vermeer and AWS Certified Welding Inspector.
The standards are based on the needs of construction, says Riley Wyers, a welding engineer with Komatsu also serving on the D14 committee member and a AWS Certified Welding Inspector.
Before starting a welding repair, contact the equipment dealer or OEM. The service team may coordinate with welding engineers and design engineers and produce a detailed repair plan. These people understand the background of the product, know the materials involved, have experience with similar situations and can identify the root cause of the problem (for example, fatigue cracking could be due to loading a part beyond its design criteria).
A general repair plan for welding repair
- Identify base metal type
- Work area preparation and safety
- Preparing the metal surface
- Preheat and interpass temperatures
- Work lead connection (grounding)
- Welding details by process
- Filler metals
- Certifications (welder qualifications)
- Weld acceptance criteria
How to prepare a joint for welding repair
AWS D14.3 Clause 9.3 – Preparation of Materials states that “joint edges shall be uniform and free from fins, notches, tears, cracks and other irregularities that will adversely affect the quality or strength of the weld member.”
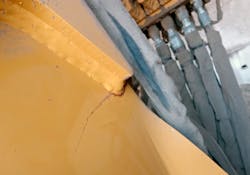
“Prepare the joint down to shiny steel,” says Bailey. “You can use carbon arc gouging, plasma cutting, or gouging and oxy-fuel. Be sure to grind out contaminates from these processes because you don’t want them to become included in the weld. Don’t skimp on the grinding disks. Also, to prevent chasing a crack, you may need to drill a stop hole at the tip of the crack.”
Wyers says bevel angles are also critical.
“For example, if the joint is too narrow, the weld metal won’t solidify properly and that can lead to what is commonly known as hot cracking,” he says. “To prevent issues such as this, Annex A of D14.3 illustrates a huge number of prequalified welding joints. A prequalified Welding Procedure Specification, or WPS, is defined as exempt from WPS qualification testing, which is how using AWS standards prevent reinventing the wheel.”
The importance of temperature in welding repairs
Temperature matters at every step of the repair process, as it influences the metal’s microstructure, fatigue life, mechanical properties, dimensional stability, the ability to reduce or redistribute residual stress, and prevent hydrogen cracking. High-strength steel, quenched and tempered steel, and castings are all temperature sensitive.
“If components get too hot during welding, product life can be negatively affected,” says Bailey. “OEMs provide strict temperature limits for field repairs because they have learned from experience. Know your target temperature, the minimum and maximum temperatures, and any limitations on temperature rise and cooling rates.”
For measuring preheat and interpass temperatures, temperature sticks offer more consistent accuracy than infrared guns. Although “old school,” these crayon-like sticks are engineered to instantly melt within ± 1 percent of the designated temperature for easy and immediate visual inspection.
“Make sure you have temperature sticks for both ends of the spectrum,” says Bailey. “Maintain interpass temperature, but don’t exceed it. If you take a lunch break, you may need to heat the part before welding again.”
Says Wyers:
“It is best to heat all sides of the steel evenly, but sometimes it is not always practical. I’ve seen procedures from companies that make metal wear parts, and they provide good guidance on preheat methods and procedures.”
AWS D14.3 Clause 9.4.5 notes that preheat and interpass temperature ranges apply to the full thickness of the weld joint and not “less than 3 inches in all directions for the point of welding.”
Before doing the weld repair, connect the work lead (ground) to clean, bare metal (for good current transfer) and as close as practical to the repair location. Welding current can arc inside a bearing or cylinder and melt the surface of the material or produce small craters.
“We commonly see what goes wrong when someone connects the ground lead to a convenient frame location instead of thinking about what happens if the welding current path passes through bearings, hydraulic cylinders, circuit boards, or bolted parts,” says Bailey. “Because arc damage isn’t visible, you won’t know it until the bearing prematurely fails or the cylinder starts leaking hydraulic fluid.”
Hard facing also requires understanding. For example, some hard facing electrodes are designed to cross check for stress relief. They crack, which is all right in some applications because the deposited metal has a high hardness for abrasion resistance.
“In cases where a crack in a particular location on a machine could propagate beyond the surface, it could be detrimental to fatigue life,” says Bailey. “In this instance, the OEM will recommend a type of wear material that is not going to crack and will maintain structural integrity.”
Wyers recalls one end-user working with a quartz slurry with very fine abrasion particles. The standard electrode for this application costs about $5 a pound, but the implement teeth did not last. The OEM product team engineer examined the application and qualified a welding procedure using an electrode with a different balance of tungsten carbides and nickel.
“The recommended electrode costs $50 to $75 a pound, but the customer said it was worth the cost because they didn’t have the downtime changing teeth so often,” says Wyers.
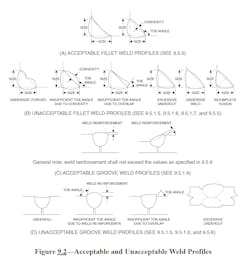
As AWS Certified Welding Inspectors, Bailey and Wyers appreciate the clarity provided by AWS standards for determining acceptable welds (Table 9.2 provides an example).
“While each welder has their own signature, and a beautiful weld is a subjective opinion, the standards help define workmanship tolerances,” says Bailey. “Using standards as an unbiased third-party improves communication and helps diffuse tension when discussing quality with welders.”
Concludes Wyers:
“AWS D14 provides guidance for every step of the welding repair process, and it even has accommodations for situations not covered by the standards,” says Wyers. “These standards belong in every repair facility. Their cost is nominal. They can save you untold hours and dollars by helping you repair a part right the first time, and they offer essential advice that contributes to a safe repair operation.”


